ps -eo pid,vsz,rss,user,cmd|more
at the top 10 swap consumers, try:
ps -eo vsz,rss,args | awk '{print $1-$2" "$3;}'| sort -rn | head
ps -eo vsz,rss,pid,args | awk '{print $1-$2" "$3 " " $4;}'| sort -rn |head -200
lsof -p PID
du -cms * |sort -rn |head -30
Daily backup under Ubuntu
Step 1) create a file:
sudo mcedit /root/daily_backup.sh
Write the following lines to file (try to put it without line break) :
rsync -a --delete --log-file=/data/backup/crontab_log/$(date +%Y%m%d)_rsync.log --exclude "/media" --exclude "/mnt" --exclude "/home" --exclude "/data" --exclude "/proc" --exclude "/lost+found" --exclude "/dev" --exclude "/sys" --exclude "/tmp" --exclude "/var/cache/apt/" --exclude "/cdrom" / /data/backup/crontab_ubuntu_backup
What does this command?
-a: means that copy file in archive mode, once the file is copied next time only the changes will be copied;
--delete: delete files from destination if they are deleted from source;
--log-file: where to put log file;
--exclude: exclude files matching the pattern;
/: source, in my case it is the root (/);
/data/backup/crontab_ubuntu_backup: destination;
Step 2) make file executable:
sudo chmod +x /root/daily_backup.sh
Step 3) create a cron job:
sudo crontab -e
Under the line "# m h dom mon dow command" start a new line and write:
1 2 * * * /root/daily_backup.sh
Once again what does it mean?
- 1: number of minutes;
- 2: number of hours (0-24);
- *: day of month;
- *: month;
- *: day of week;
- /root/daily_backup.sh: command to execute;
so I have created a job that executes every day at 02:01 h.
Take a look on the following sites for detailed description for the rsync and crontab command.
janos ujvari @October 21, 2008.
Extending swap space
Recently I have run into a problem when I want to install some program on my Ubuntu machine.
The problem was that the program figured out that the machine has not have enough swap space so i had to extend it:
Step 1.: create a swap file;
Step 2.: alter the create file
Step 3.: "turn it on" as a swap file
Step 4.: add entries to /etc/fstab file
/extraswap.img none swap defaults 0 0
janos ujvari @ 14th, October 2008
The problem was that the program figured out that the machine has not have enough swap space so i had to extend it:
Step 1.: create a swap file;
sudo dd if=/dev/zero of=/extraswap.img bs=1M count=500
this command would create an 500MB file.Step 2.: alter the create file
sudo touch /extraswap.img
Step 3.: "turn it on" as a swap file
sudo swapon /extraswap.img
Step 4.: add entries to /etc/fstab file
/extraswap.img none swap defaults 0 0
janos ujvari @ 14th, October 2008
Mount remote folders with sshfs
Trough my work I had have a need for remote folders/files; so when it is possible I am using sshfs to mount remote things.
Step 1:
create a mount folder:
Step 2:
mount remote folder:
Step 3:
get to work!
Step 4:
unmounting remote folder:
Note: if you want to enable access to ather users use the allow_other option:
janos ujvari @October 11, 2008
Step 1:
create a mount folder:
sudo mkdir /mnt/remote
Step 2:
mount remote folder:
sudo sshfs someuser@remote_machine:/home/someuser/somfolder /mnt/remote
Step 3:
get to work!
Step 4:
unmounting remote folder:
sudo umount /mnt/remote
or you can use the following, but I prefer the first one: sudo fusermount -u /mnt/remote
Note: if you want to enable access to ather users use the allow_other option:
sudo sshfs someuser@remote_machine:/home/someuser/somfolder /mnt/remote -o allow_other
janos ujvari @October 11, 2008
mount windows share folder
mount -t cifs -o iocharset=iso8859-1,codepage=cp850 //10.10.10.10/share /mnt/share/
Setup ddclient
# Configuration file for ddclient generated by debconf
#
# /etc/ddclient.conf
pid=/var/run/ddclient.pid
protocol=dyndns2
use=web
server=members.dyndns.org
login=dyndns_user
password='dyndns_password'
xxxx.dyndns.info
#
# /etc/ddclient.conf
pid=/var/run/ddclient.pid
protocol=dyndns2
use=web
server=members.dyndns.org
login=dyndns_user
password='dyndns_password'
xxxx.dyndns.info
Install Oracle Enterprise Manager on Windows Xp
Hi there today I'll show how to install EM on Xp.
First download and extract the source then change your working directory to gridcontrol and start setup.exe by double clicking on it.
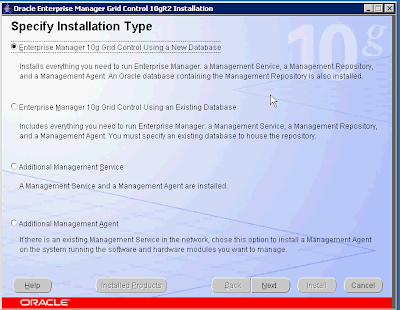
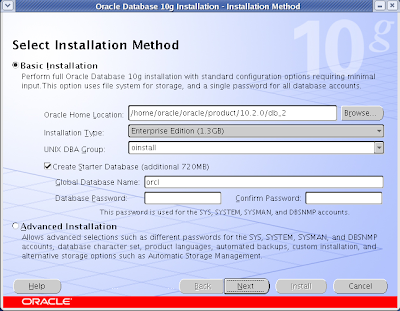
select the radio button next to using new db ...
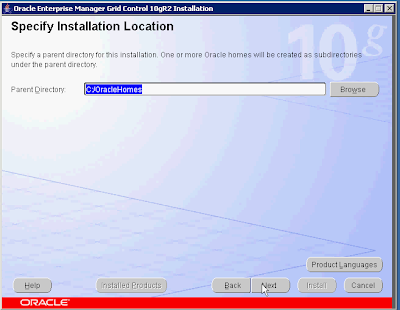
... set the location where you want to install the EM and click on Next ...
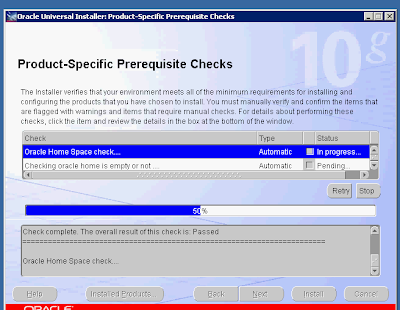
... the OUI check if your system mets the requirement for installation, if it does not the please fix it before continuing and click on Next ...
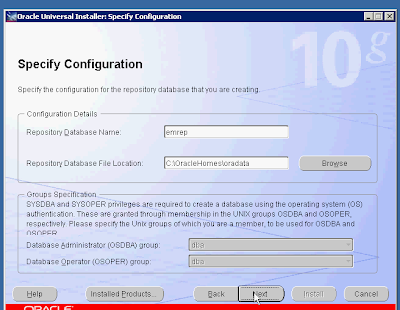
... EM needs a db where to store info, because I choose an option with new db, it will create it; so set the db name and file location and click on Next ...
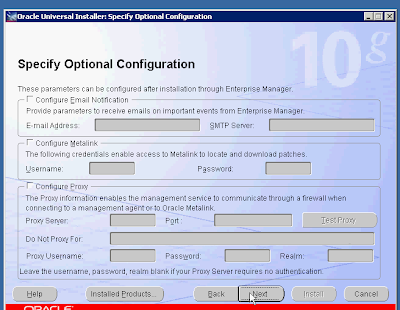
... just click Next ...

... set the password and click on Next ...
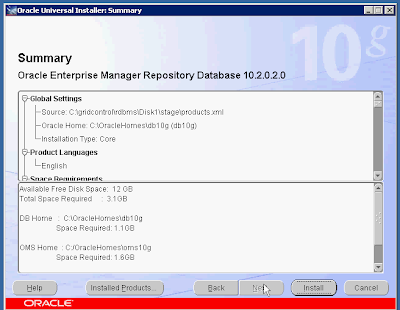
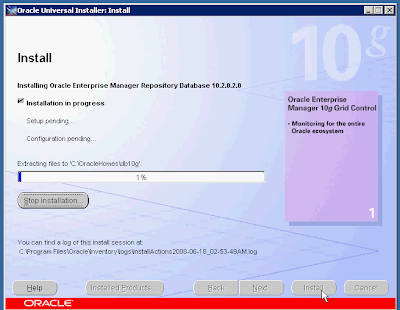
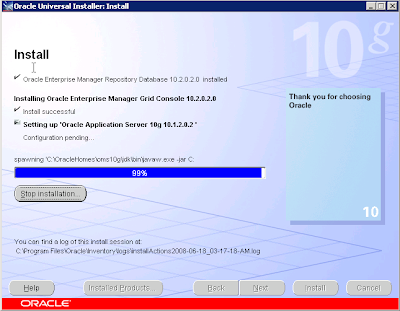
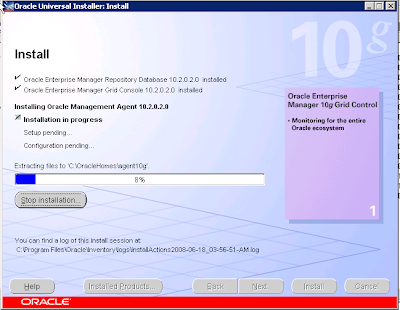
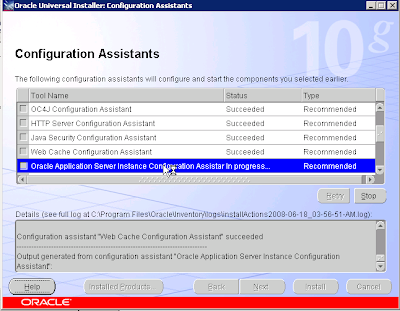
... here is an installation summary by clicking on Install the installation begins,
Note: depending on your system it may take time, so be patient ...
...
...
...
janos ujvari
June 18, 2008
First download and extract the source then change your working directory to gridcontrol and start setup.exe by double clicking on it.

select the radio button next to using new db ...

... set the location where you want to install the EM and click on Next ...

... the OUI check if your system mets the requirement for installation, if it does not the please fix it before continuing and click on Next ...

... EM needs a db where to store info, because I choose an option with new db, it will create it; so set the db name and file location and click on Next ...

... just click Next ...

... set the password and click on Next ...

... here is an installation summary by clicking on Install the installation begins,
Note: depending on your system it may take time, so be patient ...

...

...

...


janos ujvari
June 18, 2008
Install Oracle Enterprise Manager 10g on Red Hat Enterprise Linux 4
Hi there today I'll show how to install EM on linux.
First check that your system satisfied the requirement for installation,
Modify the /etc/sysctl.conf file to include the lines appropriate to your operating system:
kernel.shmmax = 536870912
kernel.shmmni = 4096
kernel.shmall = 2097152
# semaphores: semmsl, semmns, semopm, semmni
kernel.sem = 250 32000 100 128
fs.file-max = 65536
net.ipv4.ip_local_port_range = 1024 65000
net.core.rmem_default=262144
net.core.rmem_max=262144
net.core.wmem_default=262144
net.core.wmem_max=262144
run the following command to "reload" kernel settings:

Select the installation with new database and click on Next...

... set the path where you want to install and click on Next ...

... set the path for oraInventory and an translational group ...

... the system now check for requirements,
note: in my case every is installed by the book but oracle doesn't recognize three packages, simply ignore it and click next ...

... leave everything on default and click Next ...

... click Next ...

... set the passwords ...

... there is an summary, click on Install to begin the installation,
Note: depending on your system it may take a wile, in my case it is about 1.5 h ...


... during installation you must run two script as root, after you run it click on OK ...

... it creates a db ...

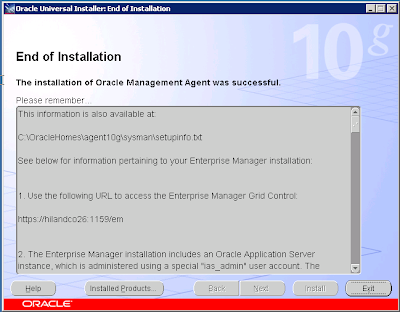
... read carefully the summary and click on Exit ...

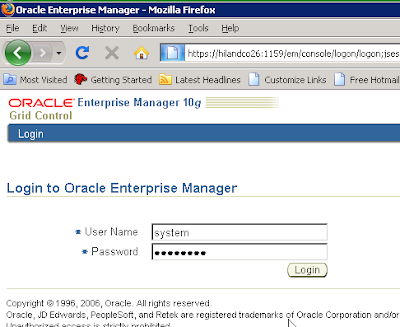
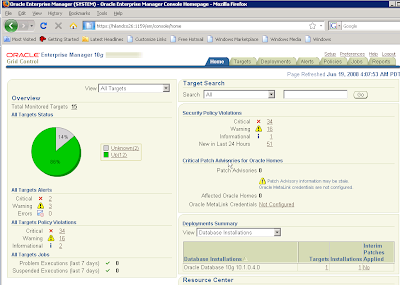
Here is a print screen from EM login page:

janos ujvari
June 16, 2008.
First check that your system satisfied the requirement for installation,
Modify the /etc/sysctl.conf file to include the lines appropriate to your operating system:
kernel.shmmax = 536870912
kernel.shmmni = 4096
kernel.shmall = 2097152
# semaphores: semmsl, semmns, semopm, semmni
kernel.sem = 250 32000 100 128
fs.file-max = 65536
net.ipv4.ip_local_port_range = 1024 65000
net.core.rmem_default=262144
net.core.rmem_max=262144
net.core.wmem_default=262144
net.core.wmem_max=262144
run the following command to "reload" kernel settings:
# /sbin/sysctl -p
the following (or later) packages must be installed:- glibc-2.3.4-2.9
- make-3.79
- binutils-2.15.92.0.2-13
- gcc-3.4.3-22.1
- libaio-0.3.96
- glibc-common-2.3.4-2.9
- setarch-1.6-1
- pdksh-5.2.14-30
- openmotif21-2.1.30-11
- sysstat-5.0.5-1
- gnome-libs-1.4.1.2.90-44.1
- libstdc++-3.4.3-22.1
- libstdc++devel-3.4.3-22.1
- compat-libstdc++-296-2.96-132.7.2
- compat-db-4.1.25-9
- control-center-2.8.0-12
- xscreensaver-4.18-5.rhel4.2
# rpm -q package-name
if something is missing then install it:# rpm -Uvh package-name
Now you had to create groups, user and directory structure for installation:# groupadd oinstall
# groupadd dba
# groupadd oper
# useradd -g oinstall -G dba oracle
# passwd oracle
# mkdir -p /u01/app/oracle/product/
# chown -R oracle:oinstall /u01
log in as oracle user, download the installation source, unpack, change your working directory to source and run runInstaller.sh:# groupadd dba
# groupadd oper
# useradd -g oinstall -G dba oracle
# passwd oracle
# mkdir -p /u01/app/oracle/product/
# chown -R oracle:oinstall /u01
# ./runInstaller.sh

Select the installation with new database and click on Next...

... set the path where you want to install and click on Next ...

... set the path for oraInventory and an translational group ...

... the system now check for requirements,
note: in my case every is installed by the book but oracle doesn't recognize three packages, simply ignore it and click next ...

... leave everything on default and click Next ...

... click Next ...

... set the passwords ...

... there is an summary, click on Install to begin the installation,
Note: depending on your system it may take a wile, in my case it is about 1.5 h ...


... during installation you must run two script as root, after you run it click on OK ...

... it creates a db ...

... read carefully the summary and click on Exit ...

Here is a print screen from EM login page:

janos ujvari
June 16, 2008.
Create db with DBCA on Red Hat Enterprise Linux 4
Hi there, today I'll show you how to create a database with pictures and at the you can watch a video about it.
So lets it begin: start DBCA, run
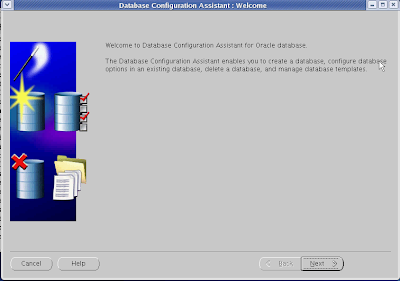
... click Next ...
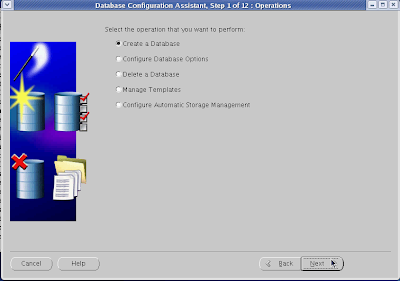
... select the radio button next to Create a Database and click next ...
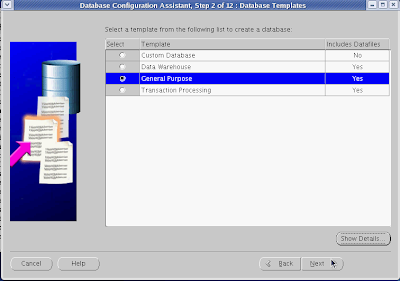
... select General Purpose so that way you'll create the db from template, an click on Next ...
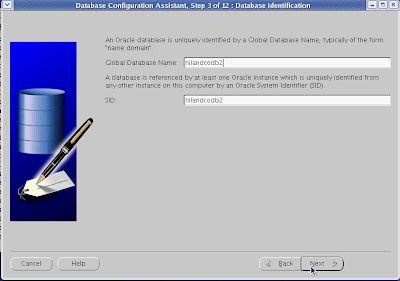
... set the name and SID for you db ...

... just leave everything on default a Click on next ...
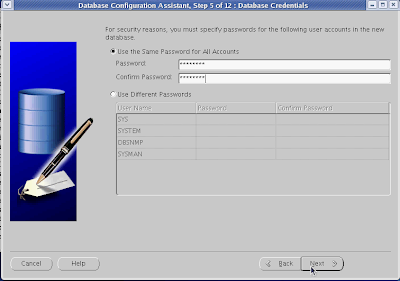
... I'll prefer to set for default users same password, but you can set it one by one, anyway when you set click on Next ...
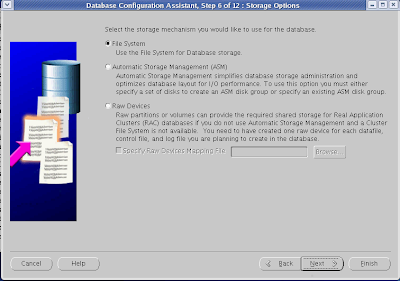
... select File System for storage mechanism and click Next ...
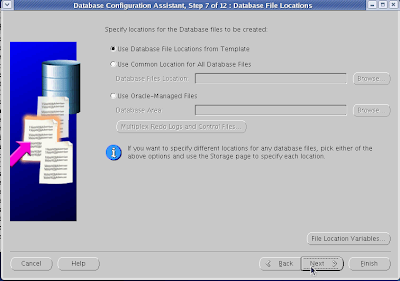
... Use Database File Location From Template and click Next ...
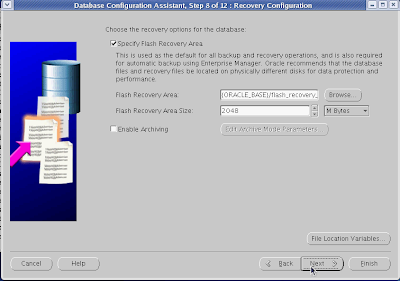
... Flash Recovery Area is new to oracle, it was introduced by Oracle 10g; just leave the default and click Next ...
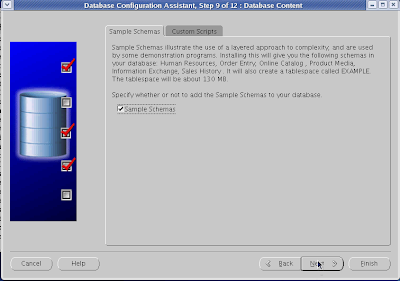
... if you to want install sample schemas, if not leave the check box unchecked and click Next ...
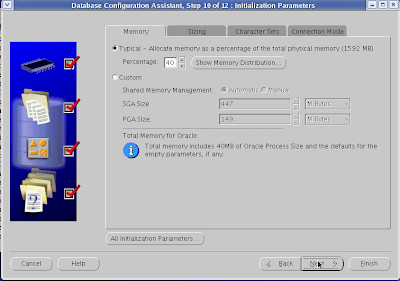
... you can set the memory allocation by hand or leave it to DBCA to decide it, and click Next ...
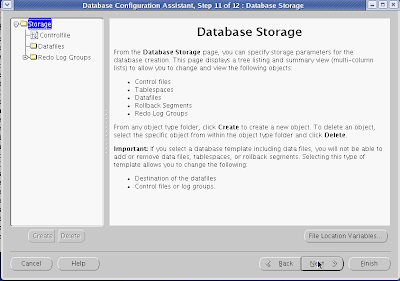
... here you can add/delete some db files, click Next ...
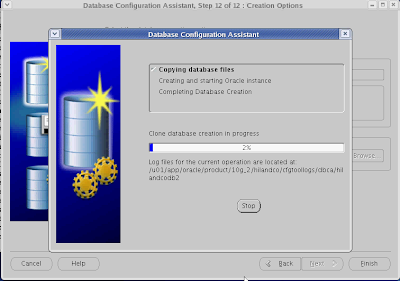
... keep eye on, so you can track the translational process ...
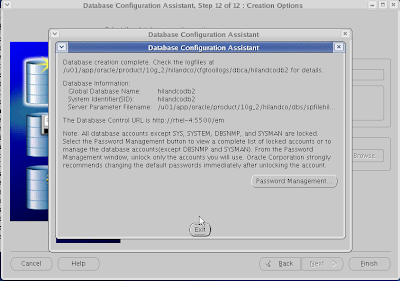
... click on Password Management if you want to change password or lock/unlock users ...
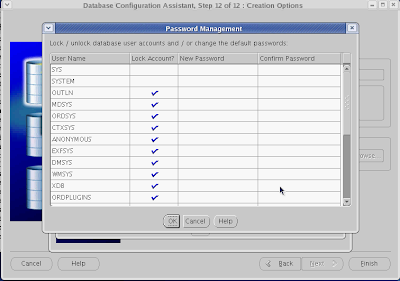
... click Ok to leave the Password Management window than click Exit to exit from DBCA.
janos ujvari
June 03, 2008
So lets it begin: start DBCA, run
# /u01/app/oracle/product/10g_2/hilandco/bin/dbca

... click Next ...

... select the radio button next to Create a Database and click next ...

... select General Purpose so that way you'll create the db from template, an click on Next ...

... set the name and SID for you db ...

... just leave everything on default a Click on next ...

... I'll prefer to set for default users same password, but you can set it one by one, anyway when you set click on Next ...

... select File System for storage mechanism and click Next ...

... Use Database File Location From Template and click Next ...

... Flash Recovery Area is new to oracle, it was introduced by Oracle 10g; just leave the default and click Next ...

... if you to want install sample schemas, if not leave the check box unchecked and click Next ...

... you can set the memory allocation by hand or leave it to DBCA to decide it, and click Next ...

... here you can add/delete some db files, click Next ...

... keep eye on, so you can track the translational process ...

... click on Password Management if you want to change password or lock/unlock users ...

... click Ok to leave the Password Management window than click Exit to exit from DBCA.
janos ujvari
June 03, 2008
Install Oracle 10g R2 on Red Hat Enterprise Linux 4
Before you begin you must check that your system met some requirements:
1. Required kernel version: 2.6.5-7.97 (or later)
Check your kernel version by running the following command:
kernel.shmall = 2097152
kernel.shmmax = 536870912
kernel.shmmni = 4096
kernel.sem = 250 32000 100 128
fs.file-max = 65536
net.ipv4.ip_local_port_range = 1024 65000
net.core.rmem_default=262144
net.core.wmem_default=262144
net.core.rmem_max=262144
net.core.wmem_max=262144
Assuming that you kernel is set to the default run the following command:
kernel.shmall = 2097152
kernel.shmmax = 536870912
kernel.shmmni = 4096
kernel.sem = 250 32000 100 128
fs.file-max = 65536
net.ipv4.ip_local_port_range = 1024 65000
net.core.rmem_default=262144
net.core.wmem_default=262144
net.core.rmem_max=262144
net.core.wmem_max=262144
run command:
oracle soft nproc 2047
oracle hard nproc 16384
oracle soft nofile 1024
oracle hard nofile 65536
Click on radio button next to Advanced Installation and click on Next button.
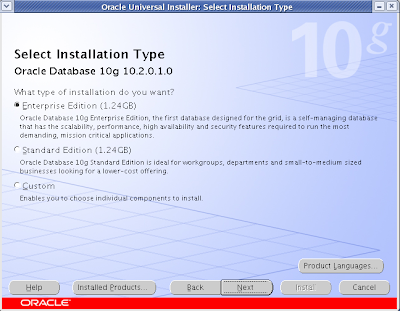
Select Enterprise Edition and click on Next.
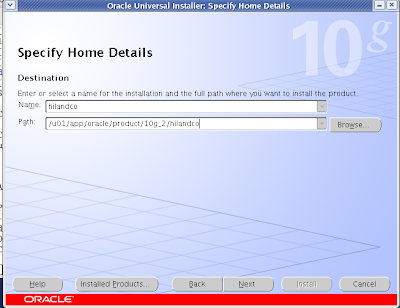
Set the name of the installation (hilandco) and the installation path(/u01/app…) and click Next.
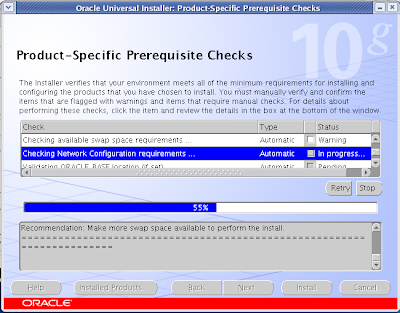
The OUI is checks that my system met the requirement.
Note: I have insufficient swap space, but I have more than enough RAM, so I’ll ignore warning.
Click on Next
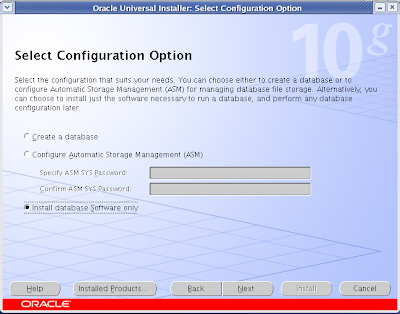
Do not create database only install database software only. Click on Next
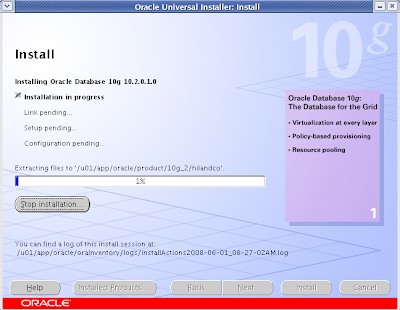
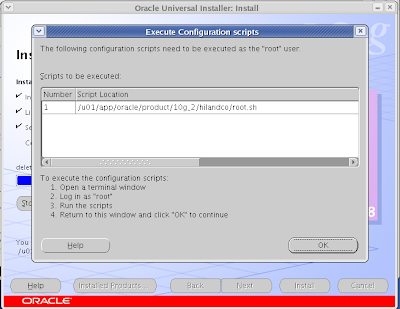
When installation is complete you need to run a script as root user.
Attention, first run the script after click on next!
janos ujvari
June 02, 2008
1. Required kernel version: 2.6.5-7.97 (or later)
Check your kernel version by running the following command:
# uname –r
2. The minimum RAM required is 1024MB, and the minimum required swap space is 1GB. Swap space should be twice the amount of RAM for systems with 2GB of RAM or less and between one and two times the amount of RAM for systems with more than 2GB. To check available RAM and swap space run:# grep MemTotal /proc/meminfo
# grep SwapTotal /proc/meminfo
You also need 2.5GB of available disk space for the Oracle Database 10g Release 2 software and another 1.2GB for the database. The /tmp directory needs at least 400MB of free space. To check the available disk space on your system, run the following command:# grep SwapTotal /proc/meminfo
# df –h
3. The following packages (or later) must be installed:- binutils-2.15.92.0.2-10.EL4
- compat-db-4.1.25-9
- control-center-2.8.0-12
- gcc-3.4.3-9.EL4
- gcc-c++-3.4.3-9.EL4
- glibc-2.3.4-2
- glibc-common-2.3.4-2
- gnome-libs-1.4.1.2.90-44.1
- libstdc++-3.4.3-9.EL4
- libstdc++-devel-3.4.3-9.EL4
- make-3.80-5
- pdksh-5.2.14-30
- sysstat-5.0.5-1
- xscreensaver-4.18-5.rhel4.2
- libaio-0.3.96
- openmotif21-2.1.30-11.RHEL4.2 (Required only to install Oracle demos. Installation of Oracle demos is not covered by this guide.)
# rpm –q libaio
In case that you missing something install it with a following command:# rpm –Uvh package name
4. Set kernel parameters and shell limits for Oracle. Linux allows modification of most kernel parameters while the system is up and running. There's no need to reboot the system after making kernel parameter changes. Oracle Database 10g Release 2 requires the kernel parameter settings shown below. The values given are minimums, so if your system uses a larger value, don't change it.kernel.shmall = 2097152
kernel.shmmax = 536870912
kernel.shmmni = 4096
kernel.sem = 250 32000 100 128
fs.file-max = 65536
net.ipv4.ip_local_port_range = 1024 65000
net.core.rmem_default=262144
net.core.wmem_default=262144
net.core.rmem_max=262144
net.core.wmem_max=262144
Assuming that you kernel is set to the default run the following command:
#mcedit /etc/sysctl.conf
At the end write the following things:kernel.shmall = 2097152
kernel.shmmax = 536870912
kernel.shmmni = 4096
kernel.sem = 250 32000 100 128
fs.file-max = 65536
net.ipv4.ip_local_port_range = 1024 65000
net.core.rmem_default=262144
net.core.wmem_default=262144
net.core.rmem_max=262144
net.core.wmem_max=262144
run command:
# /sbin/sysctl –p
Set shell limits for oracle user:# mcedit /etc/security/limits.conf
At the end write the following things:oracle soft nproc 2047
oracle hard nproc 16384
oracle soft nofile 1024
oracle hard nofile 65536
#mcedit /etc/profile
At the end write the following things:if [ \$USER = "oracle" ]; then
if [ \$SHELL = "/bin/ksh" ]; then
-p 16384
ulimit -n 65536
else
ulimit -u 16384 -n 65536
fi
umask 022
fi#mcedit /etc/csh.login
At the end write the following things:if ( \$USER == "oracle" ) then5. Create group and user for installation:
limit maxproc 16384
limit descriptors 65536
umask 022
endif
# groupadd dba
# groupadd oinstall
# useradd –g oinstall –G dba –d /home/oracle oracle
6. Create the directories to store the db software and had it over to oracle (assuming that you are logged in as supper user)# groupadd oinstall
# useradd –g oinstall –G dba –d /home/oracle oracle
# mkdir –p /u01/app/oracle/
# chmod 775 –R /u01/app/oracle
#chown oracle.oinstall –R /u01/app/oracle
Now you have everything except the source, download it from http://www.oracle.com/technology/software/products/database/oracle10g/htdocs/10201linuxsoft.html. Log in as oracle user, and unpack the zip archive:# chmod 775 –R /u01/app/oracle
#chown oracle.oinstall –R /u01/app/oracle
# unzip 10201_database_linux32.zip
Change your working directory to database# cd database
And start up the universal installer:# ./RunInsaller

Click on radio button next to Advanced Installation and click on Next button.

Select Enterprise Edition and click on Next.

Set the name of the installation (hilandco) and the installation path(/u01/app…) and click Next.

The OUI is checks that my system met the requirement.
Note: I have insufficient swap space, but I have more than enough RAM, so I’ll ignore warning.
Click on Next

Do not create database only install database software only. Click on Next

When installation is complete you need to run a script as root user.
Attention, first run the script after click on next!

# su
Add root’s password# /u01/app/oracle/10g_2/hilandco/root.sh
Now you can click on OK
Now the installation is finished remember the urls and click Exit.
janos ujvari
June 02, 2008
Subscribe to:
Posts (Atom)